Multifondo
The Multifondo theme uses the powerful and popular page builder plugin, Elementor page builder plugin (free or Pro versions) in conjunction with the IgnitionDeck Crowdfunding plugins. Custom crowdfunding modules, specifically designed to work with the Elementor templates make it simple to design the look and feel of your site and incorporate the IgnitionDeck Crowdfunding functionality, whether for traditional crowdfunding, charitable fundraising, real estate investments, or other equity-raising projects.
To install this theme you must have a working version of WordPress and the IgnitionDeck Crowdfunding plugins already installed and set up.
- For instructions on how to install WordPress, please see WordPress.org’s documentation.
- For instructions on installing IgnitionDeck, see the main IgnitionDeck Documentation.
Installation
WordPress Upload
- Download the Multifondo Theme from your IgnitionDeck Dashboard.
- Navigate to Appearance > Themes > Add New > Upload Theme.
- Click the Choose File button, select the multifondo.zip file from your computer and click the Install Now button.
- Once the theme package has been uploaded, WordPress will prompt you to activate the theme.
-
Follow the prompts to install the 2 required plugin dependencies, both of which are included with the theme:
- Boosted Elements, and
- Progression Elements—Multifondo
FTP Upload
- Download the Multifondo Theme from your IgnitionDeck Dashboard.
- Unzip the multifondo.zip package.
- Using your FTP program, upload the resulting theme folder to your website’s /wp-content/themes/ directory.
- Then log into your WordPress Dashboard, navigate to Appearance > Themes and activate Multifondo.
-
Follow the prompts to install the 2 required plugin dependencies, both of which are included with the theme:
- Boosted Elements, and
- Progression Elements—Multifondo
First Steps
Define the location of the Multifondo Homepage
-
Create a new Page and select the Elementor Full Width template. This will be your homepage. Save the blank page.
Note: the Default template is suitable for simple internal pages such as blog posts, whereas the Elementor Canvas is for advanced users that wish to control all aspects of the page design including enqueuing your own scripts.

Correct template to choose for Elementor builder -
Navigate to Settings » Reading and set the page just created as the homepage using the Your homepage displays » Static page and choose the newly created page. Save your settings.

Settings » Reading


Navigation and Site Identity
Heads up!
The Multifondo theme has an integrated Header that is auto-populated with 1) your site's logo, 2) the navigation items designated as the primary menu, and 3) the dynamic IDC Account links.
These are all defined via WP's Appearance » Customize interface.
If you choose to create a custom Header through Elementor or use the Elementor Canvas template, these elements will need to be created manually including the dynamic IDC Account links. See the Custom User Account Links tutorial for further instructions.
- Navigate to Appearance » Menus and create a new menu for the main menu location and set it as Primary.
- Add the homepage from the Pages section
- (Optional) Create a custom link using the domain name with the slug /projects/ (i.e. https://domain.com/projects/) to use Multifondo's archive template to dynamically display the published projects on the site in one location.
- Additional links can be added to the menu at a later time.
- Navigate to Appearance » Customize » IDC Account Links and select Primary menu. This will add the Create Account/My Account and Login/Logout menu items to the end of the main navigation.
- Navigate to Appearance » Customize » Header.
- Under Logo you can upload a logo image for your site.
-
Under Header Options, set a colour or image to appear in the header area of the internal (non-homepage) pages instead of the default colour/texture.


Good to know
There are two header sections here:
- the Header Background which covers the entire area from the browser edge down to your content, and
- the Header Top Background which covers the area behind the navigation.
The Header Top Background is entirely optional and only needs to be used if the navigation background is to be a different colour from the rest of the header or if a transparency over a background image is needed for clarity.
Building the Homepage
Return to the Pages menu of the WP admin and select the option to edit your new homepage with the Elementor Editor.
For specific instructions on how to use various elements provided by the Elementor plugins, please refer to the Elementor Editor documentation.
By default, the top section includes the navigation menu which is edited in Appearance » Menu. This section can be set to include only the menu with a unique colour or background, or the section can be set with the navigation overlaying the hero section.
Setting the Section Height
-
Click on the Edit Section button:

Edit Section - For navigation only, set the minimum height to 99px.
-
For a hero that includes the navigation, start with a minimum height of 500px. This can always be adjusted later based on need and/or preference.

Section height of navigation only vs. hero including space for navigation


Create a Home Hero Section with buttons
- Use the Style settings to add a background (image or colour), and optional overlays, borders, shape dividers.
- Add a Column to the Section.
-
Within the Column element, add one or two Heading element(s) for the site title and (optional) tagline. Style the text as desired.

Add header and (optional) secondary text -
Add an Inner Section element below the Heading(s). This will automatically add two inner columns which will be used to host two buttons.
Additional columns can be added, if desired, by clicking on the Edit Column button.

Edit column icon location -
Add a Button element into the left column.
Add the text "Find a Project" and optionally, add an icon.
The URL will be set as
https://domain.com/projects/. This is the location of the default project archive page.
"Find a Project" button - (Optional) Duplicate the first button to carry over the styling and drag the new button into the right hand column, or
-
Add a Button element into the right column.
Add the text "Start a Project" and optionally, add an icon.
The URL will be set as
https://domain.com/dashboard/?create_project=1.
"Start a Project" button Note: the user will only be directed to the project form if they are logged in and have creator permissions; otherwise, they will be directed to register/login at the default dashboard page.


Adding a Projects to the Home Page
 The custom IgnitionDeck Crowdfunding module, grid and slider, use the Project Categories to filter and display the site's projects into a grid layout or an animated slider.
- Start by creating the project categories to be used on your site. See the Project Categories documentation for more information on how to create these.
-
Once there are published projects on the site, the populated project categories will appear in the Post Query list. You can choose a single category or multiple categories depending on the output you want:

Post Query to filter projects by Project Category

Gird Module
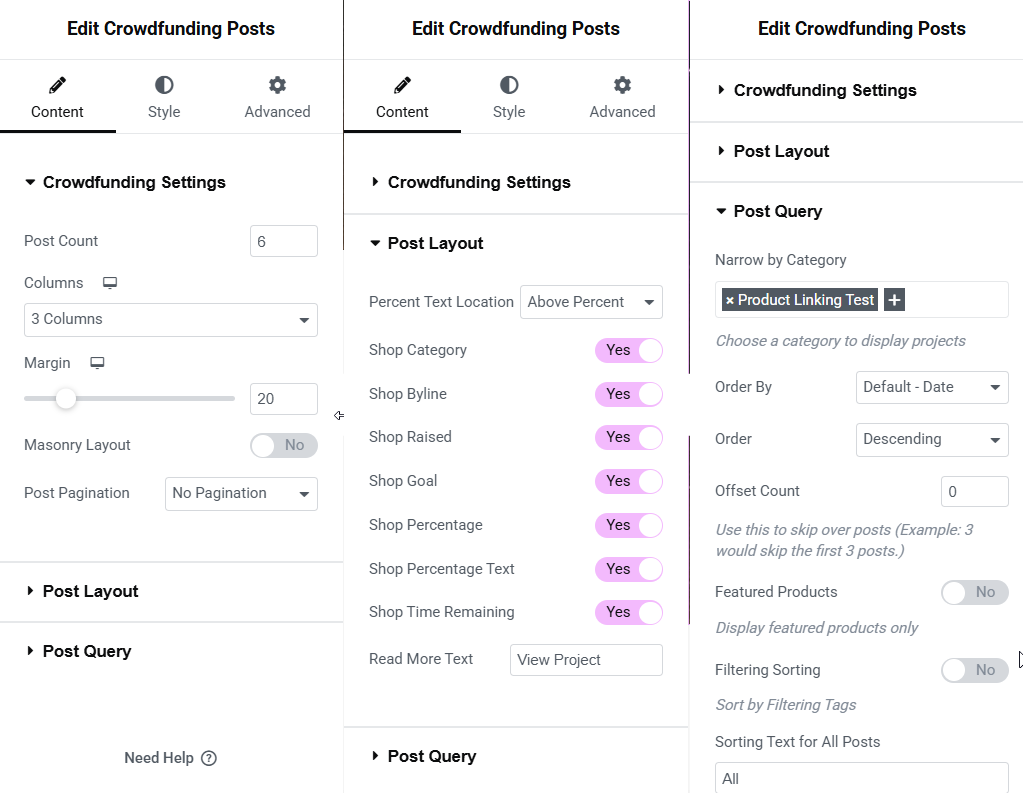
The grid module can be configured to display projects with multiple configurations and filtering preferences.
Crowdfunding Settings
- the number of projects to appear in the grid,
- the number of columns that should appear on the page (1-6),
- whether pagination is allowed when the total of projects exceeds the limit,
- whether there should be a load more button or more projects should be loaded when the visitor scrolls the page, and
- whether the masonry layout (projects are automatically shifted to fill empty spaces) is used.
Post Layout
- The settings here determine how the data for each project is displayed in the project grid. Setting "Yes" will display the project category, byline (creator name), amount raised, goal, percentage, and time remaining on the project
- The percent text location will set that text above or below the coloured meter that graphically displays the project raised percentage
- The Read More text, displays a button on hover over the project image for supporters to navigate to the individual project page
Post Query
- The Narrow by Category can be set to include only specific project categories (as set in Projects » Category) or left blank to include all projects (no filtering)
- Order by allows the ordering of the project by (publishing) date, project title, last modified date, or random
- Order can be set as ascending or descending
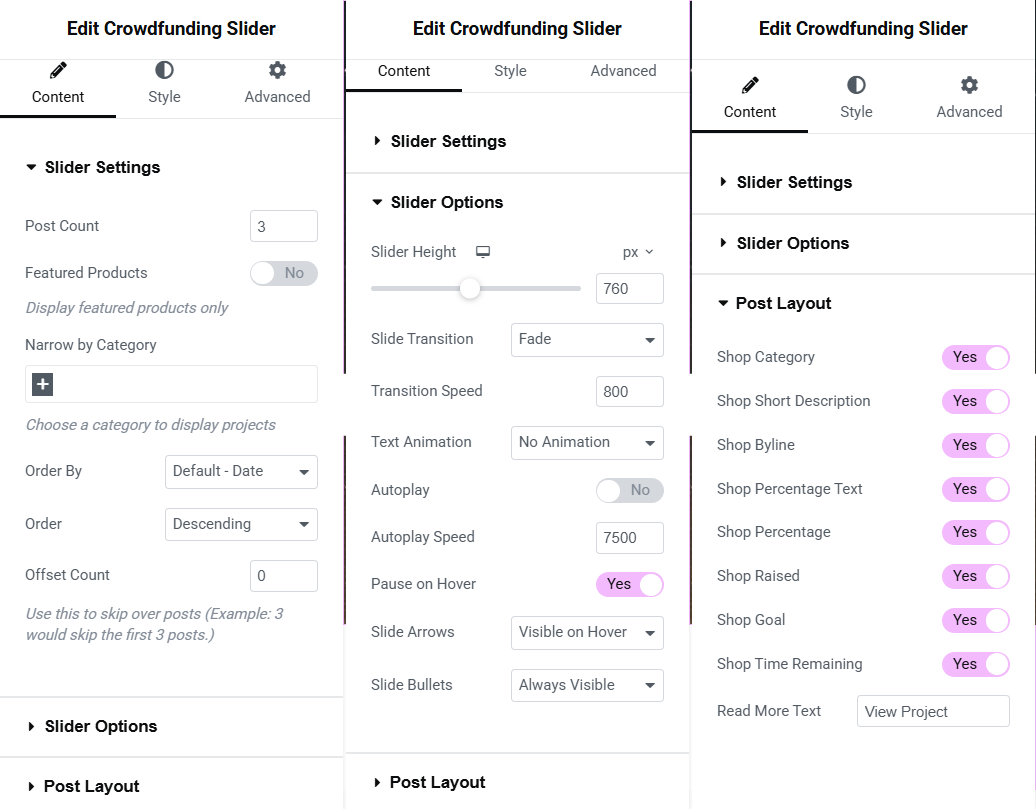
Slider Module
The slider module can be configured to display projects with multiple configurations and filtering preferences.
Slider Settings
- The number of projects to appear in the slider,
- The Narrow by Category can be set to include only specific project categories (as set in Projects » Category) or left blank to include all projects (no filtering),
- Order by allows the ordering of the project by (publishing) date, project title, last modified date, or random,
- Order can be set as ascending or descending.
Slider Options
- Slider Height is the height on the page. The background image of the slider will use the project's featured image (the image that appears at the top of the project page and/or in the project grid),
- Slide Transition is how the slider is animated on the page (slide vs. fade in) and Transition Speed is how fast this occurs,
- Text Animation can be used, optionally, to have the project text load separately from the background image,
- Autoplay and Autoplay Speed sets if the slider should start scrolling immediately on page load and how quickly,
- Pause on Hover dictates how the slider behaves when interacted with (i.e. on hover),
- Slide Arrows sets whether to display navigation arrows for the slider and how they are displayed/interacted with, and
- Slide Bullets determines whether to display bullets to indicate how many sliders are present in the display and their display behaviour.
Good to know
The crowdfunding modules will not appear on the published page until there are published projects on the site.
The preview and Elementor editor appearance may differ until the page is published/updated because Elementor does not reload the scripts required to display the project content on the fly in the editor.
Useful URLs for buttons and Calls to Action
Dashboard/Login: https://domain.com/dashboard/
Register/Create Account: https://domain.com/dashboard/?action=register
Create Project: https://domain.com/dashboard/?create_project=1
Default Projects page (i.e. find a project): https://domain.com/projects/
Project Category archive page: https://domain.com/project-category/category-slug/
Important!
The IgnitionDeck default pages are rendered with shortcodes (i.e. dashboard [idc_dashboard] and the checkout [idc_checkout] ). These must be created using the Default template and saved using the default WP editor.
Using the Elementor editor on these pages will break this functionality resulting in errors.
Updating theme dependencies
If installing the theme update does not initiate any available updates to the Progression Elements—Multifondo plugin (see Release Notes), it is safe to deactivate/delete that plugin and follow the prompt to install the latest version from the theme dependency dialogue