Protecting Content and Access with ID Commerce Products
Controlling how visitors interact with your site can be a challenging process. While many mainstream crowdfunding platforms provide an all-access pass, it is not necessarily the right solution for everyone. The "one size" approach doesn't really "fit all".
Here are a few scenarios where different control might apply to your situation:
- You have a niche crowdfunding site and require potential creators to authenticate themselves before setting up projects,
- You need to authorize potential project backers by verifying their identity and financial qualifications before viewing and supporting projects,
- You prefer to have potential creators pay a one time or recurring fee for publishing projects on your site, in lieu of collecting per transaction crowdfunding fees,
- You are a Creative with a site where your patrons can access exclusive content by paying a one-time or recurring fee
Controlling access to content, projects, and even creator functionality can all be easily accomplished by using the ID Commerce products assigned to a user’s account.
Let’s break down the process of how this can be accomplished.
Tutorial Table of Contents
Define a Registration Product
In all scenarios, the starting place is to assign a free product to the user account on registration. This will be assigned automatically when any new user account is created on your site.
While technically this is not needed for scenario #3 and #4, it is a good way to ensure there is always a method to control access on user accounts should the user bypass the preferred onboarding path.
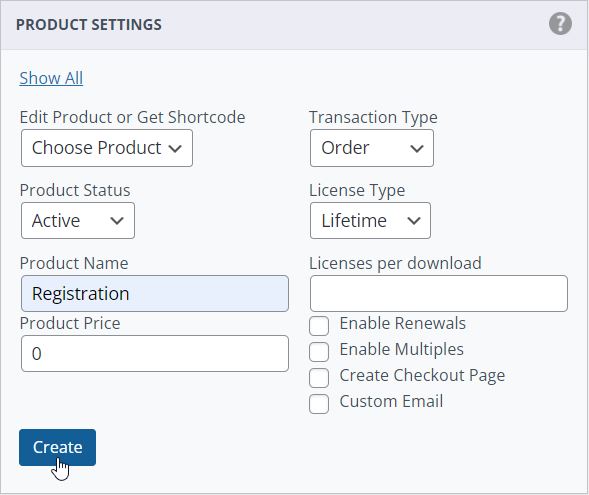
To begin, create the product to be assigned to the new account upon successful registration.
- Navigate to IDC » Product Settings,
- Create a new product name “Registration”,
- Assign a product price of “0”,
- Set the license type of “Lifetime” (non-expiring), and
- Click the Create button to save the product.
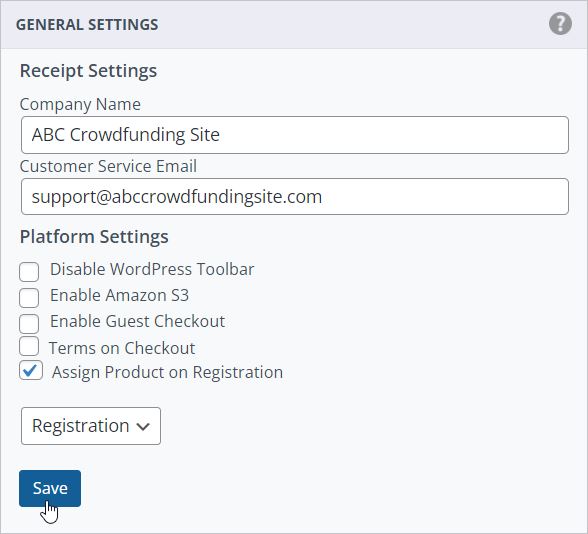
Next, the product needs to be assigned to the registration process.
- Navigate to IDC » General Setting,
- Under the Platform Settings, check the option to Assign Product on Registration,
- Select the product you created in the previous step in IDC » Product Settings, and
- Save the settings
Once this process has been completed, whenever a user registers on the site, they will appear on the IDC » Members screen with the "Registration" product assigned to them. This is a vital step in managing users on your site and controlling their access and permissions.
Did you know: automatically assigning a product on the registration also allows you to add the user to your MailChimp mailing list?
Controlling Access with Assigned ID Products
Verified Backers and/or Creators
Congratulations! A user has successfully registered on your site. Now you can direct them to submit any additional requirements to gain further access to the site. The simplest method to accomplish this is to use a third-party form builder or an offsite application if legal or financial verification is required.
To assign additional access or permissions to their user account, you will need a second ID product to update their current account status.
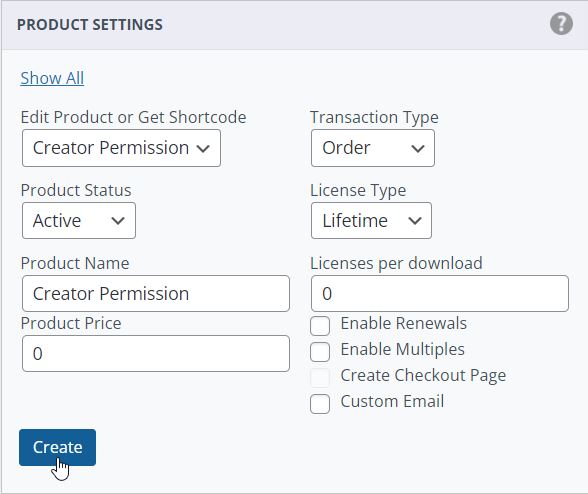
- Once again, Navigate to IDC » Product Settings,
- Create a new product name “Verified”, “Creator Permissions”, or another label that is meaningful at a glance that the user has the correct status,
- Assign a product price of “0”,
- Set the license type of “Lifetime” (non-expiring), and
- Click the Create button to save the product.
Setting Creator Permissions
Creator Permissions requires an IgnitionDeck Enterprise license
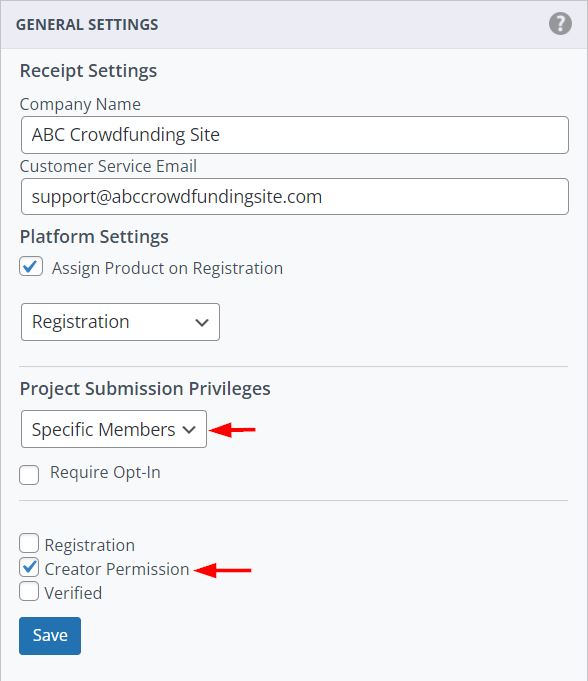
Next, the product needs to be assigned to control user permissions to access the project creator functionality.
- Navigate to IDC » General Setting,
- Under the Platform Settings, select “Specific Members” from the dropdown menu for Project Submission Privileges,
- Optionally, you can also require a secondary acceptance by the potential creator by having them “opt in”,
- Select the product you created in the previous step in IDC » Product Settings (i.e. “Creator Permissions”), and
- Save the settings
The logged in user with the Creator Permission assigned to their account will now have access to the Project Creator tools on their dashboard.
Displaying Projects to Verified Backers
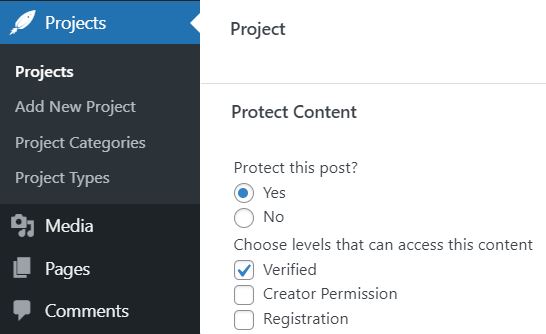
Displaying projects to verified backers is a simple process that utilizes WordPress’s core “Protect Post” functionality. To protect pages and posts from public view and only display them to the select users:
- Navigate to the project and click the edit link,
- Scroll down to Protect Content, click Yes under Protect this Post?
- Select the ID Product (i.e. Verified) that the user account requires to access the project,
- Save the project.
Projects will now be hidden from view for the general public and for any logged-in users who do not have the Verified product assigned to their account.
Updating User Accounts
But wait! Now that the criteria have been set to protect these areas of the site, how are these Verified and Creator Permission products assigned to the users' accounts? Since we initially set up a Registration product that was automatically assigned when the user signed up on the site, they will now appear in the IDC » Members table.

To update the account to include the new permissions:
- Click on the Current Products column,
- Click the box corresponding to the product to be added to the user’s account, and
- Save the addition.
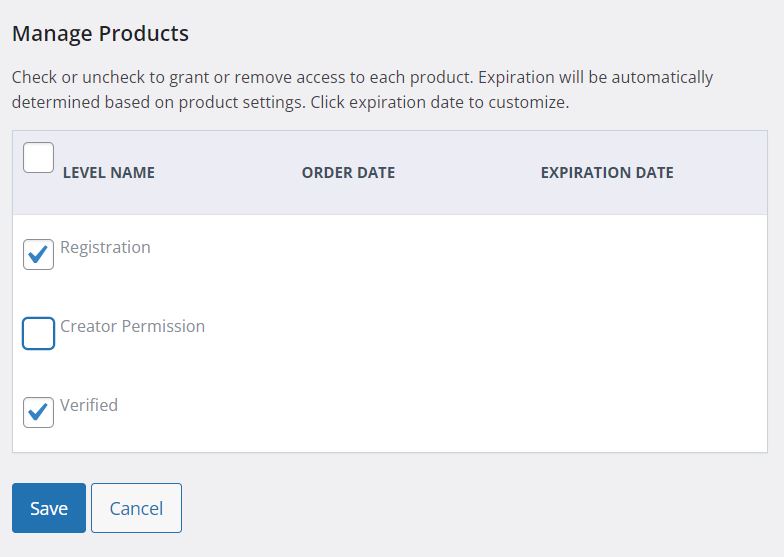
Multiple products can be added in a single session with this method. If permissions need to be revoked, the ID product can also be removed this way. Additionally, after saving the initial update to the user’s account, you can set expiry dates if you wish to grant access for a limited time.
Controlling Access with Paid Products
Perhaps you are a creative and want to offer exclusive access to your content, or your fee strategy calls for charging a nominal fee to start a crowdfunding project instead of charging per transaction fees. Having your users complete a transaction—either one time or recurring—and then using those products to control their access is the way to go.
In the previous section, we set up a registration product. This isn't strictly necessary in the following examples; however, it does provide a failsafe in case someone registers on the site without completing a transaction.
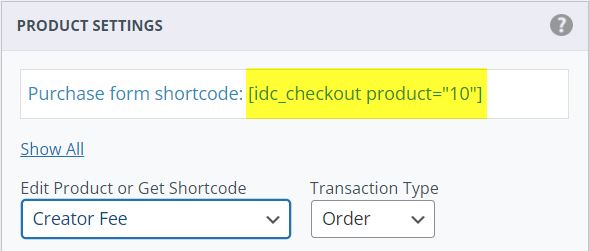
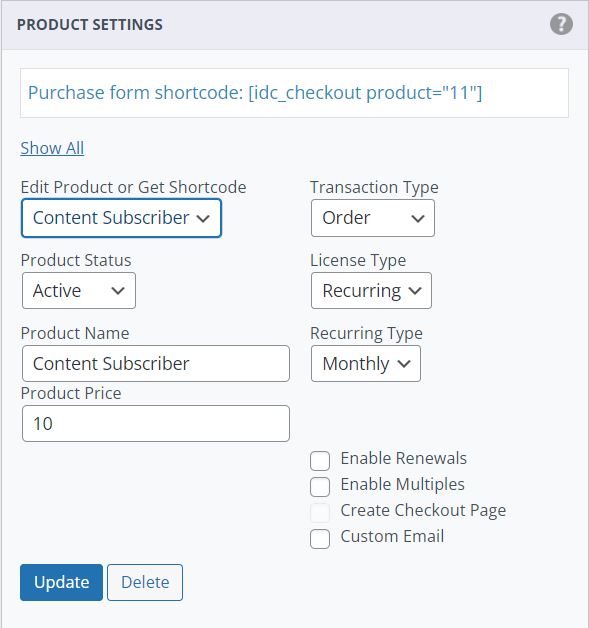
Creating a Paid Product
Setting up the paid product is very similar to the previously created "Verified" and "Creator Permission" products, but this time there will be a price associated with it, and possibly also an expiration date. Essentially, this is creating a paid "membership" on the site. A checkout page will also need to be created to direct the user to.
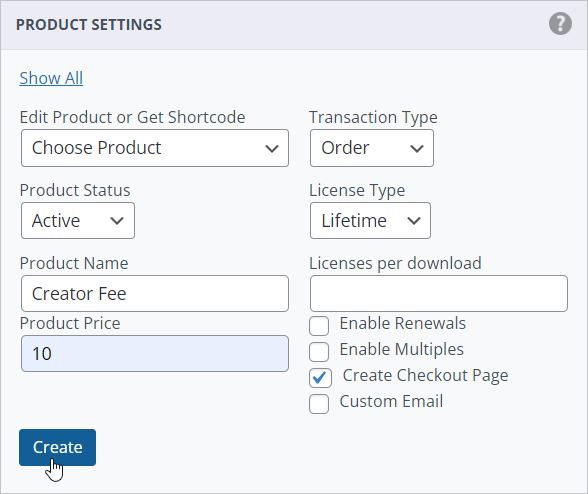
- Navigate to IDC » Product Settings,
- Create a new product name for the paid “membership” product,
- Assign a product price to be charged,
- Set the license type, term, and term count as applicable,
- (Optional) If creating a non-lifetime or non-recurring (subscription) payment, check the Enable Renewals if the user is permitted to purchase access again once the current plan has expired,
- (Optional) Click the Create Checkout Page to automatically generate the checkout page for the product which can then be linked to from the site’s navigation,
- Click the Create button to save the product.
If the option to create a checkout page was selected, the page will appear under the regular WP Pages which you can then add to the site’s navigation, widgets, etc.
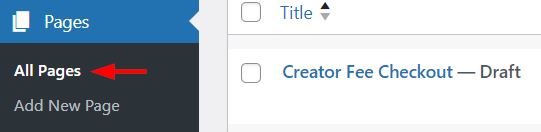
If a checkout page was not selected, then the shortcode that was generated when the product was created will need to be entered onto a page, post, or widget manually to create the checkout option for the user to interact with.
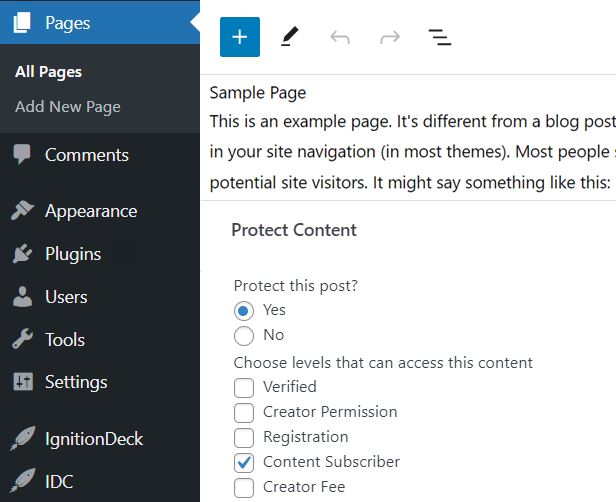
Displaying Content to Paying Users
Just like the previous section where we discussed protecting Projects from view of non-verified potential Backers, likewise content such as pages and posts can be protected and only made viewable by the subscribing user.
In this case, a Content Subscriber product, which is an ongoing monthly recurring subscription, has been created.*
This product can then be set as the required permission for a logged in user to own in order to view the protected content.
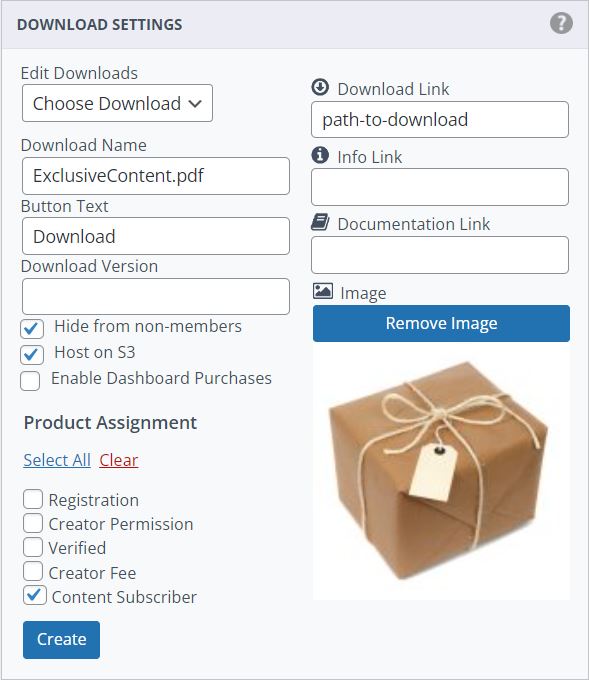
Protecting Downloads to Paying Users
The same subscription product can also be used to protect downloadable content that may be offered to supporters / patrons by assigning it a requirement on the user account. The downloadable content will only appear on the user's account dashboard if they have a valid purchase.
* Subscription support is dependent on payment gateway selection.