PayPal
PayPal is appropriate to use if you wish to provide Immediate Capture funding and/or simple subscription payments. It can be used in conjunction with a credit card processor such as Stripe.
For pre-authorized payments (100% threshold / all-or-nothing) funding option, a credit card gateway such as Stripe should be used instead.
For IDE users, capturing crowdfunding fees are not supported with PayPal so Stripe Connect should be enabled in order to charge a transaction fee regardless of the project funding type.
To read more about the capabilities of the different payment gateway options in IgnitionDeck Commerce (IDC), please see our documentation page called Choosing Payment Gateways.
NOTE: Taking IDC payments via PayPal requires at least a business-level PayPal account. To learn more about PayPal account types, see PayPal’s documentation on account types.
Set up the PayPal payment gateway in IgnitionDeck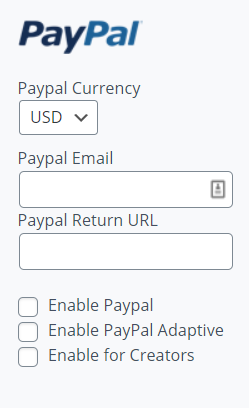

- Navigate to the IDC » Gateways screen
- Check the box to “Enable PayPal” Note that the PayPal Adaptive option has been deprecated and it only available to users that had a PPA application approved prior to 2017.
- Enter your PayPal account email address. This is the email address that PayPal will make payments to.
- (IDE only – optional) Check the “Enable for Creators” if you want project creators to be able to capture funds directly.
- Save your Gateway Settings.
Set up the payment gateway in PayPal dashboard
Return URL Configuration
The Return URL set in PayPal redirects your supporters back to your site after completing their transaction.
- Login to your PayPal account
- Click on the gear icon in the top right and select Account Settings.
- Scroll down the page and click on the Website Payments option

- Click on Update link for the Website preferences.
- Click the radio button to enable the auto return function and enter your site's dashboard URL (i.e. http://mysiteurl.com/dashboard).
Important note: Ensure that the correct HTTP or HTTPS protocol is used in the URL to match your site (i.e. http:// vs. https://).
- Save the settings


Instant Payment Notification (IPN) Configuration
In your PayPal account, set up the Instant Payment Notification. This is a good tool for troubleshooting any payment issues.
- Scroll down the page and click on the Website Payments option
- Click on Update link for the Instant payment notifications option.
- Click on the Choose IPN Settings button.
- Enter the notification URL which is the URL for your home page (i.e. http://domain.com).
- Click the Receive IPN Messages (Enabled) radio button.
 Note: the URL should not include the /dashboard or the deprecated /?memberdeck_notify=pp at the end of the URL.
 - Save your settings.
 Note: the URL should not include the /dashboard or the deprecated /?memberdeck_notify=pp at the end of the URL.
Congratulations: your payment gateway is now ready to use.
Once you’ve set up your payment gateway(s), you will probably want to perform some test transactions to make sure everything is working properly. For some tips on testing your payments gateway(s), see our documentation for Payment Gateway Testing.