Stripe Connect

Stripe Connect allows you, as a crowdfunding portal or e-commerce website owner, tocharge a fee on top of transactions made on your site. Stripe Connect enables fees on a flat or percentage basis, and is available as part of the IgnitionDeck Core package.
Users can authenticate (via OAuth) for your application by visiting their payment settings page, viewable once they have submitted a project or product for review, provided it has been enabled in the gateway settings menu.
Once you’ve set up your payment gateway(s), you will probably want to perform some test transactions to make sure everything is working properly. For some tips on testing your payments gateway(s), see our documentation page called Payment Gateway Testing.
Heads up!
In order to permit the creators to connect a new or existing Stripe account, you must first enable the Stripe Checkout payment gateway for the platform.
See documentation on setting up your Stripe Checkout payment gateway.
Create Your Stripe Connect Application
-
Visit your Stripe.com dashboard and under the account name, select the Switch to sandbox option, then click the + Create sandbox.

- Once in the Sandbox, click on Connect setup to start the application process or proceed to step 3 if your application has already been approved.
-
Click on Connect Overview in the left side menu, then the three • • • to reveal the Settings menu. Click on Settings or enter the URL https://dashboard.stripe.com/test/settings/connect into the browser address bar.

Connect Settings menu location -
Select the Onboarding Options under the Onboard connected accounts menu:

-
Navigate to the OAuth tab, copy and paste the Test Client ID into the Stripe Connect » Development Client ID field within the IgnitionDeck » Commerce » Gateways:

Test client ID within Stripe Connect settings 
Test client ID within the IgnitionDeck » Commerce settings
-
Enable OAuth should be turned on automatically, if not, toggle that option to enable the integration

Enable OAuth for Stripe Connect
-
Click the + Add URI button

-
Set the Redirect URI as:
https://yourdomain.com/[your-dashboard-link]/?payment_settings=1&ipn_handler=sc_returnwhere [your-dashboard-link] is replaced with the appropriate dashboard slug. This is usually
/dashboard/if you are using the default page. Substitute http if using on localhost or non-SSL development environment.
Add the redirect URI


The next step is to set the required webhook(s) for the Connected accounts.
Required Webhooks
-
Click on the Developer link in the left menu (page bottom), then click on the Webhooks tab.

-
Click on the Add Webhook button

-
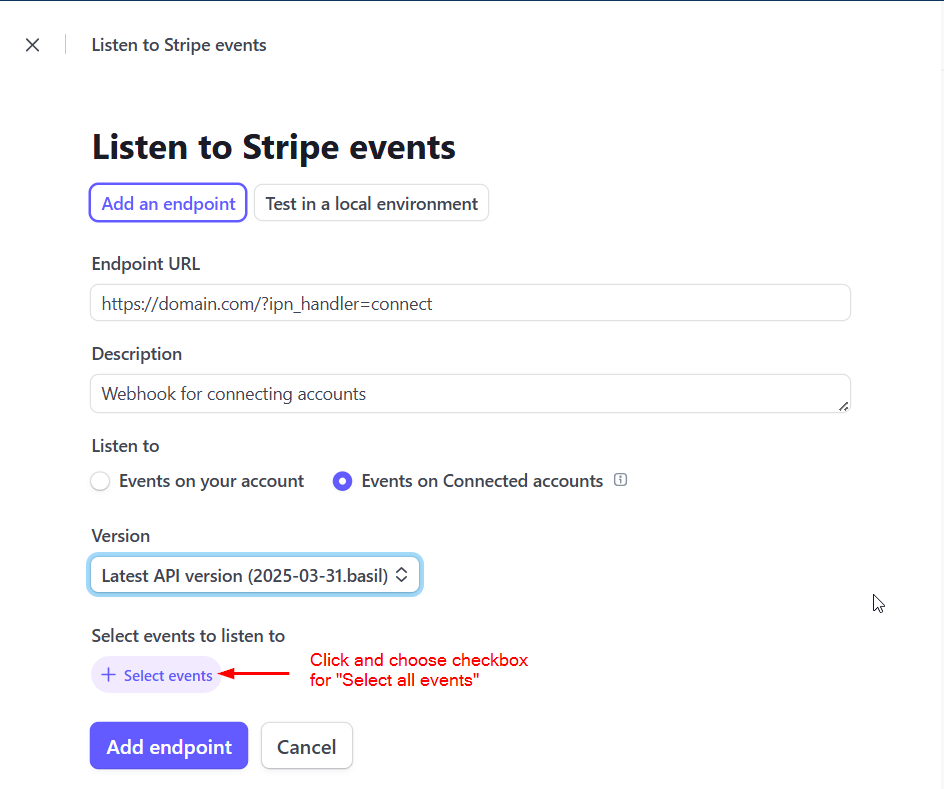
Fill out the Listen to Stripe Events form:
- Enter the Endpoint URL
https://yourdomain.com/?ipn_handler=connect,- Enter a description of the webhook (optional), and
- Select the Listen to: Events on Connected accounts.
- The Version should be the Latest API version on newly opened Stripe accounts, otherwise, it is acceptable to use the current version of the existing account.
- Click the + Select Events button to expand the events menu,
- Click the checkbox for Select all events
- Finish the webhook set up by clicking the Add endpoint button
The completed webhook configuration -
If the subscription funding types (recurring products) are being offered, click on the + Add endpoint button again and repeat steps 1-3 using the new Webhook URL:
https://yourdomain.com/?memberdeck_notify=stripe
This webhook is optional for Immediate and 100% threshold types, but required if project creators are permitted to use the Subscription / Recurring funding type.


Going Live
- Once the configuration has been completed and tested to work correctly on the site, repeat the process for the Live mode (steps 1-4), but use HTTPS instead of HTTP (SSL is required)
-
When you are ready to go live and have taken your payment gateways out of Test Mode, be sure to go to the StripeCheckout settings and uncheck the Development Mode checkbox for Stripe Connect, otherwise your project creators will not be able to connect their live payment accounts to your testing environment

Both gateway and Stripe Connect are in LIVE mode with boxes unchecked

Common Errors
No such customer or similar objects exist in live mode. But test mode key was used to make this request
This error happens when a project creator’s Stripe account has been connected during the Test mode of the payment gateway but then a payment is attempted when the gateway has been switched into Live mode. To fix this error the project creator’s Stripe credentials must be revoked from the site so that they can reconnect in the Live mode.
- Revoke credentials in Commerce » StripeCheckout » Stripe Connect » Connected User Management.
- Select the user in the drop down menu and click “Revoke Credentials”.
- The project creator can now reconnect their Stripe account in the Live mode

Important notes about the Stripe Connect Application approval process
There are a series of questions asked about how you intent to use Stripe Connect with your website. Here are some recommendations on how to complete that process
Note: recommendations do not guarantee that your application will be approved
-
The IgnitionDeck integration uses the fund flow method that sends monies directly to the connected accounts. The platform owner account does not hold funds nor perform payouts.
The correct option to select for the How will funds flow on your platform? question is Sellers will collect payments directly

-
Select the industry that best matches your business. Ultimately the platform using the IgnitionDeck plugins is an ecommerce marketplace that is facilitating ecommerce transactions for their connected users; therefore, E-commerce products is the most appropriate option*
* This answer may vary depending on other factors related to your specific business model.

- For the question Where will sellers create their accounts? Select: Onboarding hosted by Stripe
- For the question Where will sellers manage their account? Select: Stripe Dashboard

