
Stripe Checkout (SCA)
Overview
Stripe Checkout lets your supporters pay on a secure page hosted by Stripe, then sends them back to your site with a receipt. Setup takes about 15 minutes: turn the gateway on, paste in two sets of Stripe keys, and tell Stripe where to send payment confirmations.
What Stripe Checkout gives you:
- Strong Customer Authentication (SCA). Supporters in regions that require two-step card verification (such as the EU and UK) can complete it on Stripe's page.
- Wallets. Apple Pay and Google Pay appear automatically once you turn them on in your Stripe account.
- Fee Mods support. Per-project platform fees, letting supporters cover the fees, and asking for a donation at checkout all work with Stripe Checkout.
- Reliable order recording. Each payment is recorded in IgnitionDeck even if the supporter closes the browser before returning to your site (this requires the webhook setup in Step 3).
Before you start, you'll need:
- A Stripe account, with permission to view API keys and create webhooks.
- Administrator access to your WordPress site.
- Your site running on HTTPS (required for live payments).
Switching from another gateway? Capture any pending pre-authorizations or All-or-Nothing pledges first. Saved card authorizations don't carry over between gateways, so pledges left uncaptured can't be collected after you switch.
Step 1: Copy your Stripe API keys
Stripe gives you two pairs of keys: test keys for practice payments and live keys for real money. You'll paste both pairs into IgnitionDeck.
- Log in to your Stripe Dashboard.
- Go to Developers » API keys.
- Turn on Test mode (the toggle near the top of the Dashboard). Copy the Publishable key (starts with
pk_test_) and the Secret key (starts withsk_test_). - Turn Test mode off. Copy the live Publishable key (
pk_live_) and Secret key (sk_live_).
Keep the secret keys private. Anyone who has them can act on your Stripe account.
Step 2: Turn on Stripe Checkout in IgnitionDeck
- In WordPress, go to IgnitionDeck » Gateways.
-
Turn on Stripe Checkout and click Save.
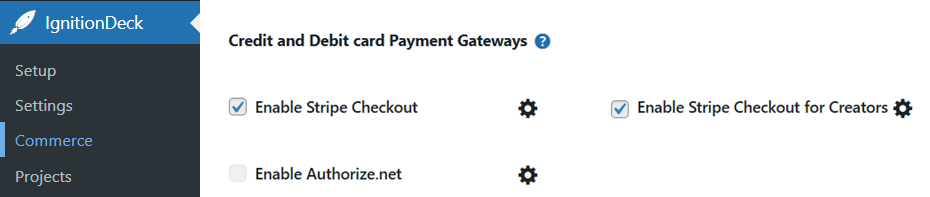
- Click the gear icon next to Stripe Checkout to open its settings.
-
Choose your Stripe Currency. Pick a currency your Stripe account supports.

- Log into your Stripe account.
-
In your Stripe account, click the Developers link at the bottom left of the page:

-
Click on the API Keys in the menu

-
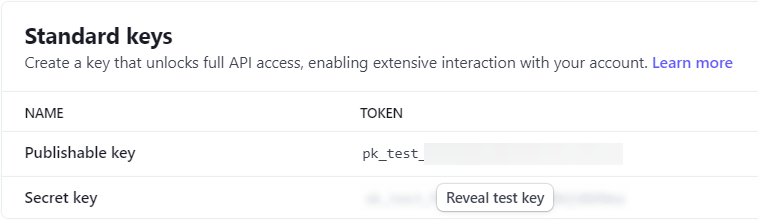
Locate the Publishable and Secret keys under Standard Keys
-
Enter the Stripe Publishable and Secret keys in the corresponding Test and Live credential fields and save the settings.
- Test keys are used for testing the payment gateway using test credit card numbers.
- Live keys are used for production ready transactions.

- Under Production / Live Credentials, paste your live Publishable Key and Secret Key.
- Click Save.


Step 3: Set up Stripe payment confirmations (webhooks)
A webhook is a message Stripe sends to your site each time a payment goes through. Without it, IgnitionDeck only records an order when the supporter returns to your site after paying. If they close the tab first, Stripe keeps the money but the order and the project total are missing it. With the webhook in place, the order is recorded either way, and never twice.
You'll create the webhook in Stripe, choose which events Stripe should send, then paste a signing secret back into IgnitionDeck. The signing secret proves each message really came from Stripe.
Your webhook URL
Every registration uses the same address. Replace yourdomain.com with your site's address:
https://yourdomain.com/?memberdeck_notify=stripe
The exact URL for your site is shown under Stripe payment confirmations on the Stripe Checkout settings page; copy it from there. Use the version of your address your site actually loads on: with or without www , and always https . Stripe doesn't follow redirects, so a URL that redirects will fail.
Which events to select
| Registration | When you need it | Stripe "Events from" option | Events to select | Where its signing secret goes |
|---|---|---|---|---|
| Account webhook | Always | Your account | checkout.session.completed , checkout.session.async_payment_succeeded , invoice.payment_succeeded |
Account signing secret |
| Connect webhook | Only if you use Stripe Connect | Connected accounts | checkout.session.completed , checkout.session.async_payment_succeeded , invoice.payment_succeeded |
Connect signing secret |
What each event does in IgnitionDeck:
checkout.session.completed: a supporter finished paying on Stripe's page. IgnitionDeck creates the order, adds it to the project total and sends the receipt.checkout.session.async_payment_succeeded: a slower payment method (such as a bank debit) cleared after checkout. IgnitionDeck records the order once the money arrives.invoice.payment_succeeded: a subscription renewed. IgnitionDeck records the renewal payment. This is the same event IgnitionDeck has always used for subscriptions.
Select only these three. IgnitionDeck ignores every other Stripe event, and selecting "all events" just adds noise to your Stripe logs. Note that invoice.paid is a different event and won't work in place of invoice.payment_succeeded .
Create the webhook in Stripe
Do this twice: once with Test mode on, and once with it off. Test and live webhooks are separate in Stripe, and each has its own signing secret.
-
In the Stripe Dashboard, go to Developers » Webhooks and click Add destination (older Dashboards call it Add endpoint).


-
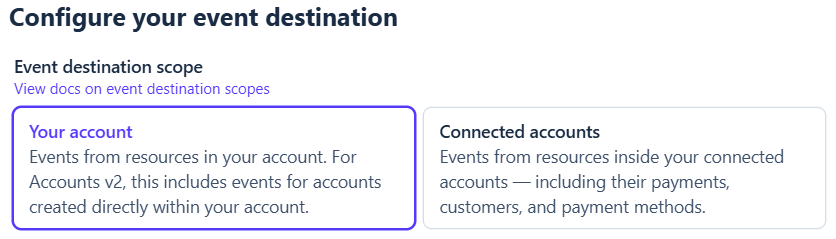
Under Event destination scope, select choose Your account.
-
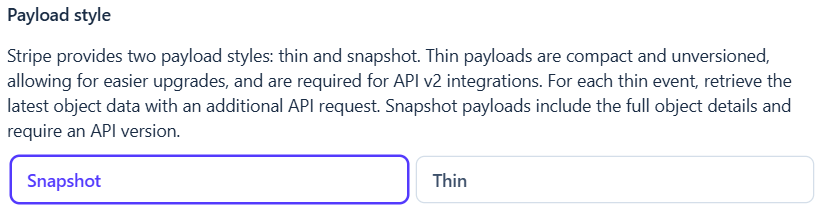
Select Payload Style: Snapshot
- Select the most current API version (usually set as Default)
- Under Events, select these three events, then click Continue:
checkout.session.completedcheckout.session.async_payment_succeededinvoice.payment_succeeded
- Choose Webhook endpoint as the destination type and click Continue
-
Enter the endpoint URL:
https://yourdomain.com/?memberdeck_notify=stripe. You can optionally add a destination name (e.g. IgnitionDeck payment return, etc.) and a description.
The endpoint URL is the same address as your account webhook - Click Create destination.
-
Then under Overview » Destination Details, click Reveal under Signing secret and copy it (starts with
whsec_).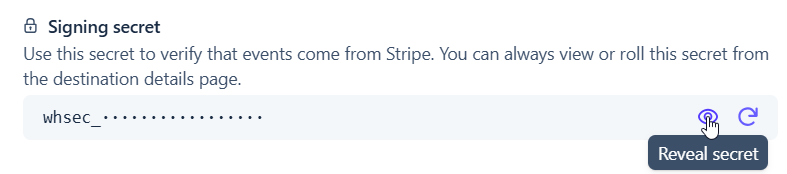
-
In IgnitionDeck, scroll to Stripe payment confirmations on the Stripe Checkout settings page. Paste the secret into Account signing secret under Staging / Test Credentials, and click Save.
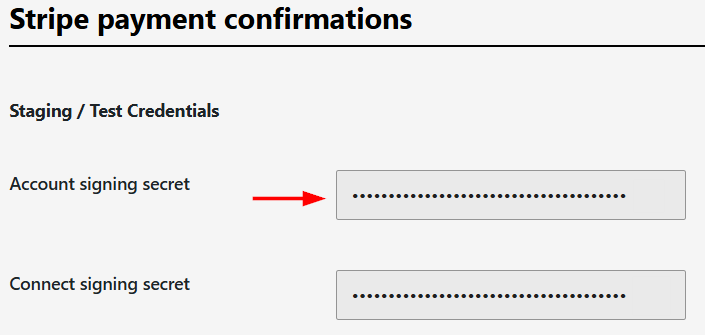
Using Stripe Connect? Repeat steps 1–6, choosing Connected accounts in step 2. Copy that registration's signing secret separately. See Stripe Connect for more details.
Don't mix them up. A test secret in a live field (or an Account secret in the Connect field) means IgnitionDeck will reject Stripe's messages.
🆕 Already using Stripe Checkout? What to change after updating (ID Commce 2.42)
Earlier versions only needed a webhook if you sold subscriptions. After this update, every Stripe Checkout site should have one. Your existing webhook URL stays the same.
- If you already have a webhook for
?memberdeck_notify=stripe: edit it in Stripe and addcheckout.session.completedandcheckout.session.async_payment_succeeded. Keepinvoice.payment_succeededselected. - If you don't have one: follow Step 3 from the start.
- Copy each webhook's signing secret into the new Stripe payment confirmations fields, for both test and live mode. Older setups never asked for this, so these fields will be empty.
- Using Stripe Connect? Make sure you also have a Connected accounts webhook with the same three events, and paste its secret into Connect signing secret.
Until the signing secrets are saved, Stripe Checkout keeps working the old way: orders are recorded only when supporters return to your site, and subscription renewals continue as before. The settings page will show No signing secret configured as a reminder.
Test your setup, then go live
- Turn Test Mode on under IgnitionDeck » Commerce » Gateways » Gateway Status Settings.
- Back a project on your site and pay with Stripe's test card
4242 4242 4242 4242, any future expiry date and any 3-digit CVC. To test two-step verification, use4000 0025 0000 3155. - Check that the order appears under your orders and that the project total went up.
- On the Stripe Checkout settings page, look under Stripe payment confirmations. It should say Last verified Checkout notification with a recent time (in UTC).
- For a stricter test, make a second payment and close the browser tab on Stripe's confirmation screen without returning to your site. The order should still appear within a minute.
- When everything works, turn Test Mode off. Your site now uses the live keys and live signing secrets.
Use a real test payment rather than Stripe's Send test event button. Sample events don't match a real checkout on your site, so IgnitionDeck can't record them and will show an error.
Troubleshooting
| What you see | What it means | What to do |
|---|---|---|
| No signing secret configured. on the settings page | No signing secret is saved for the mode your site is in (test or live). | Paste the secrets from Step 3 into the matching Test or Live fields and save. |
| Account signing secret not configured. or Connect signing secret not configured. | Stripe sent a payment for that type of account, but its secret field is empty. | Create the missing webhook (Your account or Connected accounts) and save its secret. |
| Stripe shows webhook deliveries failing with 400 | The signing secret doesn't match, or a test secret is in a live field (or the reverse). | Copy the secret again from that exact webhook in Stripe, in the same mode, and save. |
| Stripe shows webhook deliveries failing with 301 or 302 | Your webhook URL redirects (for example, www to non-www , or http to https ). |
Edit the webhook in Stripe to use the address your site actually loads on. |
| Fulfilment failed; Stripe will retry. | The message arrived and was verified, but recording the order hit an error. | Stripe retries automatically for up to 3 days. If it keeps failing, contact IgnitionDeck support. |
| A supporter sees Payment is still processing. Please check your orders shortly. | The payment hasn't cleared yet, which is common with bank debits. | No action needed. The order is recorded when Stripe confirms the payment. |
| Supporters see No Payment Options Available | No payment gateway is available for this checkout. | Check that Stripe Checkout is turned on and the keys for the current mode are saved. |
Stripe Checkout is a Strong Customer Authentication (SCA) compliant payment portal hosted by Stripe. This gateway supports those businesses operating in regions that require 2-step verification on credit card payments and also provides mobile payment options such as Apple Pay, Google Pay, and more that can be enabled via your Stripe account.
The Stripe integration also works with the Fee Mods feature providing platform fee application on a per-project basis, the option for supporters to cover fees, and the option to request a donation to the platform at the checkout step.
Heads up!
If there are pending pre-authorization charges / all-or-nothing projects underway with another credit card payment gateway, those transactions must be captured before changing the gateway to Stripe Checkout otherwise the transactions will fail upon processing.
Pre-authorization tokens are specific to the gateway that issued them and are not transferable between gateways.
Important!
Stripe Checkout will not work with Guest Checkout in any country or region that requires Strong Customer Authentication (or other 2 factor authentication) if the signing secret has not been set up on the webhook. If Guest Checkout is enabled with no webhook/signing secret, the checkout will throw a No Payment Options Available message if there are no other payment gateways (i.e. PayPal, etc.) available.